Showing posts with label Baking. Show all posts

Sunday, May 15, 2011

The Hard Truth About Scones

There are many things that I learnt from books, amongst them baking and quilting. I made my first attempt at quilting after just reading a few quilting books & magazines from the library. Very often, I bravely tried baking cakes and bread just by following the instructions from recipes. Most times I succeeded but sometimes I failed.

The fact is, there are many things in life that are not taught in the books. We have to learn them through experience, gained either from our own mistakes or through someone else's experience. Here's the lesson I learnt from scones.

I loved scones with whipped cream and strawberry jam. One night, XX's kindergarten organised a Mother's Night and at the end of the session, the teachers brought out some scones (supposedly made by the children earlier in the day) as a treat. They were scrummy! I chanced upon the recipe and it was amazingly simple (or so I thought). There were only 3 ingredients: Flour, lemonade and cream. I decided to make some scones of my own and invited some friends and their kids/mums over for high tea. 

I spent the whole morning but the first batch of scones failed miserably. They were hard as stones. What went wrong? I measured the ingredients accurately and added the lemonade and cream to the flour accordingly but the dough was so sticky. How do I roll it out and cut out a round shape if it keeps sticking to my fingers? I started to add more and more flour to the mixture thinking perhaps I didn't use enough. Big mistake. It does not get less sticky at all. I then recalled that many years ago, I spent a long time trying to make scones too and I had the same problem - sticky dough that clings to your fingers as you tried to knead it. Something was wrong and after all these years, I still didn't know what. 

Luckily, thanks to the World Wide Web, I don't need to go very far or wait very long to get help. Thanks to Youtube, I need not pay for a crash course on how to make fluffy lemonade scones. Watching this video helped me so much. I finally knew where my mistake was.


See, recipes don't tell you to use a knife instead of a spoon to mix the dough. They don't mention that you can pour the dough out when it looks like a batter. They don't describe how you simply sift lots of flour over the whole lump and then pat pat pat press press press turn it over shape shape shape into a slab. Press your cookie cutter in and voila, here comes one scone. If a picture speaks a thousand words, a video speaks millons.

After watching the video, I was encouraged to make a second attempt. It only took me a few minutes to combine the three ingredients and cut out 13 scones. How easy it was and I would have never known!  


The end result. Fluffy and soft scones. Thank you unknown Cantonese lady from Hong Kong:)


Devonshire Tea for breakfast

Hmm, wonder if there are any videos on Youtube on how to bring up good children?

Wednesday, July 28, 2010

Pavlova


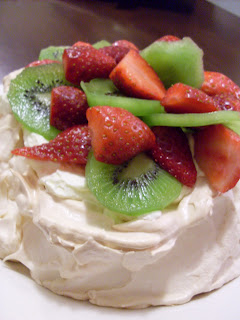
Could not resist baking a Pavlova that day when I had 6 egg whites sitting in my fridge. Perhaps the strawberries, perfect toppings for pavlova, and half a jar of cream further motivated me this is the right time, despite the fact that I've never made one before. I'd often seen ready made pavlova bases being sold in boxes in the supermarket and know that it is a popular Australian dessert but I"ve only tasted it once. What made me take the plunge was my sister and brother-in-law's presence. It's a good chance to introduce them a local favourite dessert and they like desserts!


Again I turned to my favourite cookbook, the internet, for advice and decided on a recipe from Donna Hay, a popular Australian based cookbook author. Pavlova is basically a meringue with fruit fillings. It originated in the 1920s either in New Zealand or Australia and was created in honour of the Russian ballet dancer, Anna Pavlova, during or after her tours to the countries.


After whipping the egg whites and sugar until they are thick and glossy, scoop them out onto a baking tray, arrange them into a circular shape and bake at a low heat for 1 to 1 hour 15 mins. Viola, the pavlova base is done! Doesn't sound too difficult right?


To fill it, whip up some cream, spoon it on top of the base and arrange sliced fruits to decorate. I don't think there's a fixed standard on what fruits to use, basically just use whatever is in season or whatver you desire. It entirely up to personal taste, but strawberries, kiwis are common. I go for the safest since it was my first time.


The visual appeal of this dish is fantastic and so pretty! There's something inviting about white fluffy looking meringues and the colours of the fruits just enhances it. Of course, I'm looking at it from the eyes of a dessert lover. My husband saw only sugar and fats and I had to tell my sons they're marshmallows or they won't touch it. Even then, only KK accepted it, XX just wanted the fruits neat. My sis and bro-in-law loved it though. The crispy and sweet cottony inside of the meringue melts in your mouth and the cream kind of cushions the tangy taste of the fruits. So you taste sweetness balanced with the critrus of the fruits......mmmm..:p


Though it was a successful maiden Pavlova, I won't be repeating it as our family dessert anytime soon. Nonetheless for parties, this one will impress.

Saturday, October 24, 2009

Local Delights

After 2 weeks of adjusting from jet lag and recovering from illness, I finally feel normal again. My kitchen is fully back in operation as I began to get into the hang of cooking and baking again.


I've been making some of our regular favourites, like pizzas and pastas, and also trying out quite a few new recipes, thanks in part to some new cookbooks, equipment and gadgets purchased from Singapore.


Sweet Buns

Got the recipe from Baking Mum's blog and tried it out for the first time. I made a variety of fillings, mainly strawberry jam (for XX) and chocolate (for KK). I also made some with pork floss, kaya and cheese, just to experiment a bit. It was quite fun trying out different shapes, and the children participated as well, kneading and shaping the dough. KK made a special one with the word "lego", turned out quite cute.


Chwee Kueh
I've been wanting to make these for a long time. Firstly, it's one of Hubby and my favourite hawker fare. We love the ones from Bedok. Secondly, chwee kuehs are not readily available in Melbourne. We found some at Chomp Chomps but they cost $4.50 for 3!! Though we crave for it, no way we will pay such ridiculous price for rice flour and salted tunips.

So this trip back, I made sure I stopped by Phoon Huat and got 12 chwee kueh moulds, in addition to eating my fill of Bedok's chwee kuehs. My first attempt, I didn't quite like the texture of the rice cakes. They were too dense and hard. I added 100ml more hot water and the next round turned out much softer. Still cannot beat those at Bedok's but it will satisfy the next round of cravings.


Muah Chees
I made these together with a friend, following the recipe from my latest cookbook of kuehs. Turns out really easy and just like those we eat at pasar malams! The tip is to place the sticky dough inside a plastic bag when kneading it, then it won't stick all over your fingers.


Pandan Waffles
My sister bought me a 3-in-1 sandwich maker with interchangeable grill and waffle plates. Pandan waffles is also something that I crave for from Singapore. Also waffles make a good breakfast with kaya/chocolate or dessert with ice-cream and fruits. I've been eyeing a sandwich grill and waffle maker for some time so this one really meets my needs.


Sweet Potato Fa-Gao
My friend made these and I found that they tasted good. So since I've bought a few sweet potatoes recently, I too followed the recipe and made a batch today. Yummy, though I was hoping they'll "fa" (rise) more....hee.


Thursday, September 3, 2009

Strawberry Swiss Roll


Tis the season to be eating strawberries & naval oranges. Around this time of the year, all fruit sellers are selling these 2 types of fruits at very low prices. The cheapest I've seen for strawberries is 79 cents for a 250gm punnet and if you buy 2, it's only $1.50. Naval oranges are the sweetest and juicest oranges around. Right now, we can get 3kg packs for as low as $1.99 each.


We usually use the oranges to make fresh orange juice. As for the strawberries, there are many ways of eating them. Usually I just slice it up and eat them with chocolate dips as some of them are not very sweet. Or I'll open a can of peaches and have a fruit salad. My favourite is to add them to strawberry ice-cream. Combined with peaches and some bananas, it'll beat Swensens sundae anytime!! Last night, I threw some strawberries into the blender with ice-cream and some milk for a very fruity strawberry milk shake....delicious! Worse case, if I can't finish up the strawberries, I'll just make them into jam. Luckily both my sons like strawberries and orange juice, so in whatever form, I'm happy to see them enjoy the vitamin c rich fruits.


I tried to make a strawberry swiss roll today. I have on hand fresh strawberries and half a block of Philadelphia cream cheese so I thought of making a cream cheese filling with chopped strawberries for the swiss roll. I was really scared because I have a poor track record with making sponge cakes. It almost always falls flat and often dry. See my previous post on Lamingtons.

I researched several recipes and decided to use the recipe from a cookbook I own. It uses less sugar, no butter (more healthy) and also calls for self-raising flour. I thought this might improve my chances of a more fluffy cake. My recipe asks for the eggs to be separated but interestingly, some other recipes don't.

I carefully followed the recipe, whipping up the egg whites, gradually adding in the sugar and the egg yolks, one at a time, until the part where I'm supposed to "gently fold" in the flour and hot milk. This is where I'm most panicky. What exactly does "gently fold" means? I tried to be light handed but the flour does not get incorporated so I got to keep folding and folding. And I think that's how I end up deflating the egg mixture. Plus, I tried to warm up the milk in the microwave but I overset the timing and the milk boiled all over inside the microwave. I guess I lost precious time there, mopping up the mess and reheating another bowl of milk. Grr...it's so frustrating.

Inside the oven, my swiss roll looked so ugly. In my haste not to lose anymore time, I didn't spread the mixture evenly across the pan, so the cake looked like some fat woman's lumpy tummy or cellulite sweltering in the oven's heat....haha! I took care not to overbake it, so it the nice brown colour when it came out kind of made the uneven height not too obvious. Unfortunately, the texture is very coarse....I still haven't got it :( And even more unfortunately, I used some lousy baking paper (never gonna buy that again) that stuck to the nice brown skin of the swiss roll and tore off almost everything when I unrolled the cake. It's the ugliest swiss roll I've ever seen. It need emergency cosmetic surgery. So I whipped up some more cream and covered it from head to toe. Now it's looking better with the beautiful bright red strawberries and mint leaves decoration.

The cream cheese and strawberry filling is very nice, but it's a little runny and I don't know why. With the layer of fresh cream cover, I give myself 50/100 for my swiss roll. 40 points for decoration, 10 points for the damned cake. Got to try harder.


Monday, August 10, 2009

A Very Chocolatey Cake


KK turned 7 on Singapore's 44th National Day. This year, we decided to hold a party for him at an indoor playground, inviting 10 of his friends to celebrate with him. At his age, this kind of party suits him best - except for the cake and lollie bags, I don't need to prepare anything else and there's no mess to clean up afterwards. More about this place in the next post!


KK is a chocolate lover and he requested for a "very chocolatey birthday cake". That was easy enough, thank God! If he'd requested for a "Star Wars" or "Transformer" cake, mummy would have to wave the white flag. I have on hand a tested and well-received Australian Women's Weeky Rich Chocolate Cupcake recipe. I just had to try to bake it as a whole cake and see if it worked.


It did and so KK got his chocolatey chocolate cake with homemade chocolate hazelnut spread as a filling (which I'd made earlier), topped with chocolate ganache and decorated with chocolate balls, chocolate shavings and chocolate fingers! I had imagined how to decorate it days before and I was so excited when it was finally time to decorate it! This was the most fun part of making the cake.


KK absolutely loves the cake. I love the sparkle in his eyes when he saw the completed cake in the morning. At that time I hadn't decided to write the words yet and when I asked him, he said he wanted it. So I practised a bit before writing these 'maiden words' on a cake! Not too ugly, ya? The smiley face was also a special request from my silly son. I'm very happy with the final look. Most importantly, I'm glad that it also tasted moist and super duper choco-licious!
Happy Birthday KK!


Thursday, June 25, 2009

Don't Cry For Me, Meringue


What is worse than getting fat from eating desserts?


Getting fat from eating horrible desserts - made by yourself!


It was a dessert much anticipated, at least for me. I have been eyeing this "Lemon Meringue Pie" for weeks. The 2 lemons have been bought long ago and staying fresh in the fridge waiting for this day to be made. I just needed some time and a reason.


There were no special occasions and no party invitations coming up but I did have some time the last 2 days since dinner was crockpot chicken stew and leftover crockpot chicken stew.


So the pastry crust was made before dinner on Tuesday and as it baked in the oven, the buttery aroma filled the whole house. XX ran over to me asking me what the smell was. I was so tempted to eat the crust on its own that night, but I controlled myself.


After dinner, I made the lemon filling. This was when things started to go wrong. I had set the filling to cook on the stove when I got distracted by KK who wanted me to make him a lemonade drink. I'm supposed to be stirring the filling constantly but I forgot about it for a while. When I did, which was just a few mintues later, I promptly turned off the stove, thinking I could come back later after helping KK. Unfortunately, the curd had already started to harden at the bottom. Though none was burnt and I did manage to stir till it was loosen, it was not PERFECTLY smooth.


I poured the filling into the crust and left it to chill in the fridge overnight. Wednesday night, I thought I would finally be able to savour this dessert. All that was left was the meringue.


The egg whites for the meringue were chilled in the fridge so I took it out earlier to get it to room temperature. But maybe not early enough. I'd made a meringue before for my Cuppucino Cupcakes and I noticed that this time my meringue was softer and not so fluffy. It was very glossy though. The recipe asked for hot sugar syrup to be poured into the beaten egg whites. I feel that's too much water since you need to dissolve the sugar in some water to get the syrup. I'm not sure if these are the factors that caused my meringue to weep. Yes, meringues can cry. Everything looked ok as I took it out from the oven. But after chilling it, I discovered that my pie was weeping. It 'cried' so much that there was a pool of water surrounding the pie.


Weeping's a common problem for meringues. You can read more on this site and this site. Happy Home Baker, whose recipe I used for this, has the same problem with her pie. She blamed the Singapore humid weather and her oven. But I don't have that humid weather here and my oven's pretty stable. So what went wrong?


It's the first time my husband and I have tasted a Lemon Meringue Pie. Tastewise, the lemon filling was too sour. The recipe asked for 70-80ml of fresh lemon juice and I'd used 70ml. It was too tart for my liking. Hubby didn't like the filling either. So go easy on the lemon juice if you can't take sourness. But the crust was good, if only it wasn't so soaked. The meringue was sweet and soft. So if you eat the meringue and the filling together, it sort of offset each other.


I won't recommend this recipe so I won't post it here. But I'll use the crust recipe for something else, perhaps an apple pie. Right now, I'm fantasizing about that crust and sweet apple fillings, topped by puff pastry. It shall be done...soon.

Saturday, June 6, 2009

Cuppucino in a Cupcake

My friend Jane was on her honeymoon in Australia and came over to visit us 2 days ago. I made this Cuppucino Cupcake as a dessert. Up till the last minute, I was undecided if I should make this or a lemon meringue pie or simply serve up some red bean soup. The choice became obvious when Hubby couldn't find time to get some groceries for me, including the frozen shortcrust pastry sheet needed for the lemon meringue pie.


The original recipe was for a whole cake but since I just bought some pretty cupcake paper cups, I decided to make them into little cupcakes instead, with the meringue on top resembling cuppucino froth.


This is the first time I'm attempting a meringue looking dessert. After reading Happy Home Baking's site, I'd check out some links on tips and problems of making a meringue before I started. This caused me to deviate from the recipe a little. The recipe called for the whipped egg white and sugar to be added to the unbaked batter and baked together at 180 degrees for 45 mins. However what I read about meringue is that it needs to be baked at a high temperature (like 230 degrees) for only about 5 minutes.


Thus I put the cupcakes into the oven to be baked for about 20 mins while I whipped up the meringue. Then I took out the cupcakes and spooned the meringue on top, before returning them to the oven and increasing the oven temperature to 230 C for another 5 mins.


The end result looked quite pleasing. The cake was moist and soft and the meringue was like toasted marshmallow, soft and sweet. All of us gobbled up our "cuppa" over a cup of Lavazza coffee. Definitely caffeine overdose that night.....lol


When transformed to cupcakes, the batter was only enough for 6 cupcakes, but with the meringue I whipped up, I could easily have covered 12 or more. I think this is because I'd either used deep cups with small surface area or I'd overfilled the cakes. With the leftover meringue, I baked them in a small baking dish, thinking I could perhaps make a pavlova base.


After searching a few sites, I realised that although a pavlova base is essentially a meringue, the method of baking is different. Pavlova is a traditional and popular Australian dessert that is usually topped with fruits. Salt and cornflour is usually added to the egg white and sugar and it is baked on low heat (100 - 130 C) for a long time (1 - 1.5hr) until it is firm and crispy. It is not essential for them to be tan looking. For meringues used in desserts such as Lemon Meringue pies, they are softer and have slightly browned peaks on top. To get this effect, we should go for a high temperature and shorter baking time.


Now I wondered if I had followed the original recipe, would I have ended up with a crispier and whiter 'froth' instead?


Wednesday, April 29, 2009

Pizza Yum!


KK calls it 'Pizza Yum' and he made me write down the recipe so he can print it out to put on the wall.


I thought I'll never have to make pizza ever, since we discovered Dominos sells their large pizzas here for as cheap as $4.95 each. Well, they're still good and a great value but I've noticed one thing, they don't taste as good the next day. The dough becomes quite chewy after being in the fridge.


I got the recipe for the base from here. It's called Super Easy Pizza Dough and it's as good as its name. We've made this pizza twice and so far, it hasn't failed me. The dough is easy to knead and rises well. After baking, it's soft and it's so even after reheating.


XX loves the Simply Cheese pizza from Dominos and I figured out that if I make it myself, I can make the pizza smaller and can also 'hide' some extra ingredients like chopped mushrooms and ham under the cheese. I usually make 2 batches at one go so that I can freeze some for the kids' lunch some other day.
Here's the recipe:
Super Easy Pizza Dough
(This is enough to make either 1 thick or 2 thin large pizza base)

· 2 cups plain flour
· 1 tsp sugar
· ½ tsp salt
· 8 gm (2 tsp) yeast
· 2 tbsp olive oil
· ¾ cup warm water

Method:
1. Mix all the dry ingredients in a bowl and add oil and water.
2. Mix to a soft dough. Knead on a floured surface until the dough is soft and pliable.
3. Cover with cling wrap and let it rise until dough double in size.
4. Punch the dough once to remove air bubbles. Remove from bowl and knead gently for 1 min.
5. Roll the dough out and add your favourite toppings.

Pizza Yum!
Ingredients:
· Special Tomato Sauce (Chopped/Diced tomatoes + tomato paste + minced garlic + salt/pepper/herbs)
· Thinly sliced Virginia Ham
· 3 types of Shredded Cheese (Parmesan, Mozzarella, Cheddar)
· Super Easy Pizza dough

Method:
1. Flatten the pizza dough.
2. Chop the tomatoes, add in tomato paste and stir in sugar, salt, pepper, garlic to taste.
3. Spread the tomato sauce all over the pizza.
4. Put ham on the pizza. Put cheese on top.
5. Bake in 180degrees oven for 15 mins.

Of course, with pizza, basically anything is possible. For us adults, I've added in other ingredients like onions, capsicums, mushrooms and our home grown tomatos. We've also tried putting some minced garlic into and on top of the dough, like a garlic naan.


Friday, March 6, 2009

Apple Pie

I never thought I'll bake my own apple pie. Afterall, they're so readily available in supermarkets, so affordable and so yummy too! Just pop them into the oven as you start dinner and 1 hour later, dessert is ready!


However, my mum bought a bag of 8 apples (that were on the verge of rotting) for $1. I was under pressure to puree them for XX but as he still had a jar in the freezer, I decided to steam 4 apples for him only. I decided I could perhaps try to make an apple pie, if it's not too difficult, since the oven will be heated up for baked potatoes. I hurriedly searched the internet (my favourite source of recipes these days) for an apple pie recipe. There were plenty.


Many recipes also teach you how to make the crust as well but I did not have one important ingredient - shortening. To be honest, I have no idea what that was, plus I was also lazy lah. What I do have are frozen shortcrust pastry and puff pastry. So I took 1 of each out to defrost.


For the apples, I soaked them in some water and lemon juice. Then I mix together:

  • 1 cup of sugar,

  • 1 tsp of cinnamon powder and

  • 2 tbsp of flour.

The recipe also asked for cider vinegar but I don't have that, so I skipped it.


Method:

  • Drain the apples and mix the sugar mixture over the apples.


  • Line the base of a pyrex baking dish with the short crust pastry and trimmed the edges.


  • Put the apples into the dish.


  • Before putting on the cover, dollop a few spoons of butter over the apples.


  • Seal the pie by pressing the puff pastry onto the short crust pastry with a fork.


  • Cover the edge of the pie with aluminium foil. This will prevent the edge from burning as it bakes. Remove the foil about 10 mins before it's done.


  • Bake at 200C for 50 - 60 mins.
(Place a lined baking tray below the apple pie rack in case the apple bubbles over. However mine didn't.)


The result was a nice and warm, sweet and soft apple dessert. However the crust didn't hold up very well. Not sure if the apples were too little or the crust too soaked by the apples. It collapsed as soon as it was cut and the apple sauce started oozing out.


I had just finished dinner but could not resist having a slice immediately. Neither could my dad. Surprisingly, KK liked it. He liked the apple pies from MacDonalds, but didn't really fancy those baked pie types when I baked those from Sara Lee. However, this time, he actually competed with XX to eat it. That's great!


The omission of the cider vinegar did not seem to affect the taste. I just find it too sweet, so next time, I'll reduce the sugar to 3/4 cup or even 1/2 cup. My mum also commented that the base of the pastry don't seemed too cooked. Perhaps it'll help if I baked it a little first before putting the apples inside. Anyway, not too bad for a first attempt and ridiculously simple too.

Thursday, March 5, 2009

Sour Cream Banana Cake

Bananas are not very cheap here in Australia. They are usually priced at $3.99 per kg or more. So when I see bananas at $1.99, I know I have to buy some.


The main reason I'm going bananas over bananas recently is because of XX. This boy is a real 'Cookie Monster'. He loves cookies and biscuits. Over the Chinese New Year period, I have been baking and he has been eating, a lot of cookies. He especially loves Pineapple Cookies, just like me, and can gobble down 4 - 5 every time. As a result, he was experiencing some 'technical difficulties' with his bowel movements. He used to 'go' easily but suddenly one day, he became very reluctant to go to the toilet. He would stain his diapers or pants but yet when we suggested going to the toilet, he would vehemently resist. I remembered one day, he was struggling to get off the toilet bowl and as I struggled to hold him there, I heard a 'thud' sound. We knew, and he knew very well, that he needed to 'go' but for some reason he was so scared to sit on the toilet. I suspected his stools were hard and he probably felt pain every time he passed motion, so that's why he's scared. The problem is, XX is a fussy fruit eater. The only fruits he eats now are apple puree, raisins and bananas. Nothing else.


I gave XX one banana a day but with quite a bunch of bananas, I decided to make a banana cake, at the same time using the left over sour cream in the fridge. This recipe that I randomly choose claimed that this cake doesn't last 5 mins in her family so I decided to give it a go. It turned out to be a winner. The texture is moist and soft and the smell of banana is so fragrant. The kids don't really fancy it but Hubby and my friend gave it the thumbs up. Even after putting in the fridge for a few days, the cake still tasted soft n good. My parents had some when they came and they liked it so I've baked it again this week.

Anyway, I'm happy to report that XX's bowels are back to normal already. The bananas really worked.

Tuesday, December 2, 2008

Happy Tuesdays

There are many reasons that make Tuesdays the happiest day of the week.


Firstly, petrol prices are at their lowest on this day (but don't ask me why). So most locals will try to fill their tanks on Tuesdays. Today, Hubby pumped at $1.007/litre. Cool!


Secondly, on Tuesdays, Dominos' pizzas are only $4.90 each, as compared to $6.90 normally. Second to MacDonalds, Dominos is our most frequented fast food joint. We call to make a phone order, and it's ready by the time you drive 10 mins to pick it up. Its pizzas are very reasonably priced (some supermarket frozen pizzas cost just as much) and most importantly, they are very very delicious, with generous toppings. We never knew Dominos was so good until we came here. Two large pizzas to feed the family (plus leftovers for KK's lunch the next day), for less than $10, where to find such good deals?


Thirdly, with Tuesdays being pizza nights, this means I don't have to cook! I don't need to think of what to cook and can use the time instead for baking or other hobbies.

Tuesdays are also 'walking days'. The local community hub has a walking group every Tuesday morning. Usually I'll put XX in a stroller and join them for a walk around the area, for fresh air, for exercise, for socialising. It is followed by morning tea at the hub. Even Hubby comes along when he's in town. The people in the group are quite nice and friendly.

Even KK has reasons to be happy. On Tuesdays, we give him some pocket money (20c) to bring to school for lollies!


To mark Happy Tuesday today, I made this Santa Claus cake! No lah, actually I've wanted to make this cake for a long time, after seeing its cute picture on Happy Home Baker's blog. The strawberries were on sale and they looked so beautiful I couldn't resist buying. This gives me the perfect kickstart and I finally plucked up my courage to try making a sponge cake again last night after the earlier failed attempt. Seeing that it didn't deflate, I went to get the cream and white chocolate today to decorate it. It wasn't very easy assembling the cake. The creaming was quite atrocious. Maybe I lack the right tools, I was using a spatula to spread it and the edge of the cake was the most difficult to get the cream on nicely. But thankfully, the end result still looks quite pleasing. Have you noticed that my santa's face is kind of tan? The original one is white but I used my leftover chocolate icing sugar (don't waste), so my whipped cream is light brown in colour.....haha....alamak, became asian Santa loh!

I couldn't think of any special reason for the cake so here's to Happy Tuesdays for us and advanced Merry Christmas to everyone!!

Tuesday, November 18, 2008

Healthy Treats

I have been trying to be health conscious in my diet lately. And I say 'trying' because it is proving quite difficult. You see, healthy food is sometimes very untasty. Another way to put it is: why must yummy food be so sinful? Think buttery flake pastries and sweet custard egg tarts.....hmmm.

The very yummy but sinful 'Pavlova' (made from just sugar and egg white)


Ok, maybe I'm not such a great cook but I've been trying out a few healthy, fibre-packed recipes recently and the result is only so-so in terms of taste.


Okara Oatmeal Chocolate Chip Cookies

From my soy milk making, I got a lot of okara, the left-over residue after you squeeze out the milk. I was told that this is precious stuff, with as much protein as the milk but 32 times as much fibre. Instead of wasting it and throwing them away, I thought of ways to consume them. I've tried to make soy patties, but they didn't turn out too great. I surfed the internet and found this Okara Oatmeal Chocolate Chip Cookies recipe, which I thought is great for the kids. It also uses oats and wholemeal flour, ingredients that I recently learnt to love.


This is really a health-conscious kind of recipe. There wasn't any butter nor sugar added, only canola oil and honey. As a result, the taste is rather bland but you can't deny the nutrition. And as expected, the kids didn't like the 1st batch very much.


Here are some of the ingredients used in the original recipe:


I made a 2nd batch, this time I modified the recipe a little to make it tastier. I added some sultanas, replaced the canola oil with melted butter and added 2 tablespoons of sugar! Of course, it became slightly 'unhealthy' after that. But what the heck, I reasoned that if its not tasty and no one eats it, then what nutrition is there to talk about? I liked the taste of this batch much better. KK seemed to like it better but XX, who prefers crunchier biscuits, didn't quite like the soft texture of this cookie.


Pinklavender's Okara Oatmeal Chocolate Chip Cookies (the 'not as healthy' version):


Ingredients:


  • 1 cup okara (soybean meal)

  • 1/2 cup whole wheat flour

  • 1 1/2 cup rolled oats

  • 3/4 tsp baking soda

  • 1/4 cup butter, melted

  • 2 tbsp caster sugar

  • 1/2 cup honey

  • 1 tsp pure vanilla extract

  • 1/4 cup chocolate chips

  • some sultanas (or other nuts, seeds etc)

Method:


  • Preheat oven to 180 degrees C. Line cookie tray with baking paper.

  • Stir together okara, whole wheat flour, rolled oats, sugar in a medium bowl.

  • In a small bowl, melt butter and honey and stir in the vanilla extract. Dissolve the baking soda in 2 tablespoons of boiling water and add it to the mixture.

  • Add wet ingredients to the dry ingredients, stirring till combined.

  • Fold in chocolate chips and sultanas (or even nuts, sunflower seeds)

  • Using a teaspoon, scoop and drop them on to the cookie tray. Flatten slightly with the back of a fork.

  • Bake for 15-20 mins.


E's Oatmeal Chocolate Muffins


I made these muffins yesterday at 11pm. It took me more than 1 hour to get XX to fall asleep before I could creep out at about 10.30pm to wash the dinner dishes. I know it's crazy, despite the late hours, there was this urge for me to bake something. I just had to do something for myself. And it didn't take me too long. While it baked in the oven, I did the dishes.

I found this recipe here when I searched 'oatmeal, chocolate, muffins'. I want KK and XX to eat more oats but it's got to be 'chocolate' flavour, otherwise KK won't touch it. You wouldn't believe how obsessed he is with chocolate. His milk is flavoured with chocolate (milo), his cereal is Milo Crunch or Coco Crunch, ice-cream must be 'rich chocolate' flavour, and biscuits, cookies, cakes must be chocolatey too. His comment for this muffin: Can you make it more chocolatey next time?


I halved the quantity for the recipe as it was the first time I'm trying it and didn't know if its good. I took care not to overmix the batter so the texture of the muffin turned out ok but I think this muffin recipe lacks sugar. It's not sweet enough. The website is called "Calorie Count", so you can imagine why. Thank God for the saving grace of chocolate, XX and KK are not rejecting it.


Friday, November 7, 2008

ANZAC Biscuits


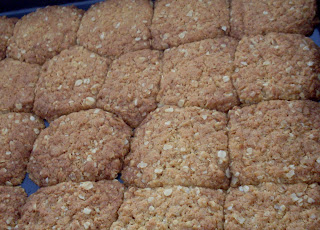
We enjoyed another bite of Australian culture last Monday in the form of delicious ANZAC Biscuits.


ANZAC (Australian and New Zealand Army Corps) biscuits' history can be traced back to World War 1. They were made by the loved ones of the soldiers and sent to those fighting abroad. The ingredients used are those that do not spoil easily as those days, these biscuits would have to endure a journey of about 2 months before reaching the soldiers.


I followed a recipe in this cookbook "Edmonds Biscuits & Slices 1" which I bought almost 10 years ago in New Zealand. I'd given this book to my sister but I don't know how come it's with me now...haha.


The biscuits are really simple to make and smells so good. The taste is very good too, as is the nutritional value. If you're thinking of introducing oats into your diet and don't eat plain oatmeal, this is a good way, I suppose.


Here's the recipe: (makes abt 22 biscuits)

1/2 cup Flour

1/2 cup sugar

3/4 cup dessicated coconut

3/4 cup rolled oats

100g butter

1 tbsp golden syrup (I used maple syrup)

1/2 tsp baking soda

2 tbsp boiling water


Method:

1) Mix flour, sugar, coconut and rolled oats.

2) Melt butter and golden syrup.

3) Dissolve baking soda in the boiling water and add to the butter and golden syrup.

4) Stir butter mixture into the dry ingredients.

5) Place level table spoons of mixture 4-5 cm apart on cold greased oven trays.

6) Bake at 180 degrees Celcius for about 15 mins or until golden brown.


The thing to note is point 5. The biscuit will grow and spread themselves during the baking. I tried to squeeze all of them into my 'not-too-big' tray and they all joined together!!!

Saturday, November 1, 2008

Homebaked Wholemeal Bread


This has to be one of the best bread I’ve ever baked and eaten. It is even better than the Milk Loaf that I’ve baked before, and more nutritious too.

I did one last night and today, I need to bake another one cos the first one is almost finished. Hubby is not a fan of those store-bought sandwich slices kind of bread. But he likes gourmet bread and he considers this wholemeal bread to be in that category. From him, that’s a big compliment.

The recipe is simple and the kneading process simple and easy. The only thing I wished is that it’s a bigger loaf. The proofing went quite well but I don’t know why, after I cut the slits on the top of the bread, the bread seems to deflate a little, as if I’d puncture it. It also did not grow any bigger in the oven. So for the 2nd loaf, I tried to cut the slits before letting it proof for the 2nd time. It works! The dough was slightly taller when sent into the oven.

Regardless, I can ignore height for quality. The bread is quite dense, not like those airy pieces of store-bought bread. However the texture is soft and the taste is slightly sweet and buttery. It tastes good even eaten plain on its own. One thing to note though, because there is no added preservatives, this bread doesn't keep well. So bake it fresh and eat it within a day or two.


What are you waiting for? Go ahead and try it! You’ll never want to buy bread from outside again.

Here’s the recipe:
150g Bread Flour (I use Bread Mix)
150g Wholemeal Flour
1 tsp Instant Yeast
½ tsp Salt
2 tbsp Caster Sugar
10g Butter
170ml Water (lukewarm)

Method:
1. Combine all the dry ingredients and mix well. Try to make sure the butter is not too cold and hard so it’s more evenly combined.

2. Make a well in the center of the mixture and pour in the water.

3. Mix into a dough. It’s not sticky so after most of the moisture is absorbed by the flour, you can turn it out and use your hands to continue kneading, until you get a smooth ball of dough.

4. Cover the dough in a bowl with a damp towel and let it proof. Depending on your climate, proof until it doubles in size.

5. Then turn it out and knead it lightly for a while before shaping it and putting it into your bread pan.

6. Cut some diagonal slits on the top of the dough to achieve a rustic looking effect. You can sprinkle some wholemeal flour over the top too.

7. Let it proof again under a damp towel till its size is doubled or you poke a finger into the dough and it leaves a dent.

8. Preheat oven to 180 degrees celcius and bake for around 30 mins. Take it out and let it cool completely.


Tuesday, October 28, 2008

My First Focaccia


I finally made my first focaccia bread. Hubby had attempted to make one long time ago but I vaguely remembered that it wasn’t very successful. Focaccia is an Italian flat oven-baked bread which may be topped with herbs and is widely available here. But there’s no beating the satisfaction of eating bread made by your own hands. Plus, with the food scare currently raging in China and Singapore, anything homemade is definitely doing you and your family a favour.


In fact, I was even going to use our home-grown rosemary herb for this bread, except that after sighting the infancy of the plant, still barely 10cm tall, I really should leave it to grow a little longer before harvesting.


Recipes are abundant all over the internet, but I decided to fall back on my favourite ‘Happy Home Baker’. However, I followed the original recipe and used 1/3 wholemeal flour and 2/3 bread flour. In addition to its higher nutritional value, I’m beginning to like the taste of wholemeal bread after coming to Australia. I don’t know why, but my only impression of wholemeal bread in Singapore was its dry texture. However, after trying out the wholemeal bread from Baker’s Taste here, I’m converted. Thus, I’ve purchased a kilo of wholemeal flour to add into my baking whenever possible.


One of our mutual friend from Singapore came over for dinner tonight. He’s a cabin crew and also Hubby’s ex-army buddy. He’ll be laying over in Melbourne for one night. The menu for the night was Neapolitan Pork Steaks with the Rosemary focaccia and rockets salad. I doubled the quantity of the focaccia recipe to make 2 loaves so that everyone can eat as much as he likes.


The kneading was supposed to take about 7mins but because of the huge quantity of flour, my poor mixer could not reach the bottom of the dough very well. I held it as it kneaded but still.... Also, the dough “looks dry”, according to Hubby. Thanks to his comment, I added a little more water to the dough. That’s my mistake. DO RESIST the temptation to add more water until all the flour is incorporated and you should touch it to decide if it’s dry, not just by looks! The dough now became very wet and sticky, thus after kneading for the longest time, I decided to take out one lump to add more flour and knead manually. Hubby also came in to help with the kneading. Finally, 2 hours after I first started the bread project and a substantial amount of flour later, we finally allowed the focaccia dough to rest and rise.


I was so afraid it wouldn’t rise properly after all the excessive kneading and extra flour. But thank God it did ‘rise to the occasion’ and pretty quickly too. After it doubled in size and when you press the dough and it doesn’t spring back, it’s ready to be punched for the 2nd rise.


The 2nd rise was beautiful as well and I’m beginning to be very hopeful about this bread. Not to mention the aroma of the rosemary! Finally, I poked the dough with my finger and distributed the rosemary on top. Then I sprinkled sea salt all over and drizzled more olive oil before sending it to the oven. My oven was big enough to accommodate both pans of bread at one go, so there’s economy of scale in terms of electricity usage and time.


25 minutes later, the breads were done and though I meant to keep the bread till the guest came, I couldn’t resist cutting out some for tasting. It was fantastic! Thank God all the additional flour and kneading did not create any damage to the bread. We couldn’t taste the garlic though. Not sure if I didn’t use enough or maybe because it wasn’t freshly chopped. (They were pre-chopped and kept in the fridge for convenience.) But the salt! My God, they were really unnecessary. I don’t know why the recipe calls for the salt to be added, the bread tasted very good on its own! It was so salty that we had to knock out all the rock salt crystals from the top before eating. So if you’re gonna follow this recipe, you can ignore the sea salt or just sprinkle in moderation.


I can’t wait to make my next wholemeal loaf! I’m also trying to find some biscuits or cake recipes that use oats. I think they’re a good way to introduce some oats into the kids’ diet. With homemade cookies or biscuits, we can also cut down on those that we purchase outside. While I cannot totally avoid buying processed food, it’s the least I can do to ensure some quality control. Nowadays, I’m rather weary when buying groceries. Who knows what strange things they’ll discover added to our food next?

Friday, October 10, 2008

Happy Anniversary!


My spirits were deflated like my chocolate sponge after it failed to rise (See Chocolate and Lamingtons) but once I'd decided to do something, I'm determined to make it happen. I wanted to bake another cake that very night but by the time I put all the kids to bed, it was already 10pm and I was pretty bushed. So I did it the next morning, on the actual day of our anniversary.


This time round, I changed the recipe to a chocolate pound cake. Till I determined exactly what went wrong, I don't want to try the sponge cake again as I couldn't afford to fail that day. The chocolate pound cake took quite a long time to make. I think it could be my cold butter and the cold environment of the house, the butter and sugar took ages to be 'light and creamy'. Other than that, everything went smooth - KK was in school - and the cake turned out well in the loaf pan.
When KK came home, he was supposed to help me with the icing and decorating. He did pour the cream and icing sugar into the mixer but his greatest contribution was cleaning out the bowl that held the cream and licking the beating hooks spotless. I'd let him try some of the cream by dipping his finger into it. After that, he liked it so much that he kept 'stealing' it from the stand mixer. I'd to stop him or I'll not have enough for the cake.
Cream Filling
  • 3/4 cup Thick Cream
  • 2 tbsp icing sugar (I used the icing mix since it's almost all icing sugar anyway)
Method:
  • Beat with mixer until stiff peaks form.
I successfully cut the cake into 3 layers and spread cream onto it. Then I put sliced strawberries on the botton layer and cover it with more cream. I did the same for the next layer but used kiwi instead.


The chocolate icing for the whole cake was made using this icing mix that I got from Coles.
Chocolate icing
  • 1 1/4 cup icing mix
  • 20g butter, softened
  • 3 tbsp hot water
Method:
  • You just melt the butter in the hot water and add it to the mix. Then you stir until it became glossy and smooth. Easy! But it was damn sweet.
Hubby and I personally don't like this type of icing as it's too sweet for our tastebuds but I needed some kind of icing to hold on the decorations on the cake. I was really proud when I added the sugar flowers to the sides and the bright red strawberries in the centre completed 'The Look'.
The cake was meant for dessert but KK couldn't wait and kept asking if he could eat it. So we cut it at about 5pm. Me and Hubby held the knife together, as if we're cutting our wedding cake years ago....haha...except this time he was carrying XX in his other arm.
The cake was kind of hard to 'break through' at first and I was going like 'arrgh' as I sawed on it. Luckily, it was just the top crust that was hard. The rest of the pound cake was moist and soft. As it's a pound cake, it is heavier and not as fluffy as a sponge. This recipe, from My Kitchen, My Laboratory, is very chocolatey and the cream strawberry and kiwi fillings was wonderful. Next time I'll put in even more fruits and a lot more cream. That would be heavenly! Just don't think about the fat and cholestrol.
I'll end off with a joke to encourage all bakers and would-be bakers out there with failed attempts. Don't be disheartened if you fail once, just press on!
It's in Chinese though:
Q: 蛋糕跌到了, 谁鼓励它站起来?
A: 小猪. 猪鼓励蛋糕.(朱古利蛋糕)
Get it? Duh!

Thursday, October 9, 2008

Chocolate and Lamingtons

For our wedding anniversary this year, I wanted to make a chocolate cake as chocolate is Hubby's all-time-favourite flavour. He would have been equally satisfied with a plain old boring chocolate cake, but I wanted to try making a cake complete with cream fillings, icing and decorations. Like those sold in the cake shops. I've never ever done this before, so I made sure I compared a few recipes, read up exactly how to cream the icing and got the right ingredients.

I finally chose a chocolate sponge recipe from Happy Home Baker's as it didn't use as much sugar and butter as the others. However, it did require the use of 4 eggs. At least they're nutritious.

Alas, instead of our anniversary cake, the chocolate sponge cake turned into Lamingtons instead.


Well, here's the full story. I'd started making the cake yesterday as I wanted to allow time for myself today to focus on cooking lunch and frosting the cake. KK was home from school and in trying to involve him in the occasion and letting him have some fun, I asked if he would like to help me. He replied enthusiastically.

Here's my biggest mistake. I allowed him to crack open an egg. I had already cracked 3 eggs into the mixing bowl and for the fouth one, I knocked it a little and asked him to simply pull it apart. From the way the boy held the egg, I should have guessed a disaster was coming. It did cross my mind, what if he screwed up? I thought the worst that could happen is he dropped the whole egg into the bowl, I'll just pick up the shells. But it was worst than that. His clumsy fingers applied so much strength to the egg that he literally burst it! A huge amount of yolk and white splashed and landed OUTSIDE the bowl and even on his sleeves. Gosh, how am I gonna salvage the situation now? The kid still had the cheek to laugh, until I scolded him. But I know, it's all my fault. So much for cooking with kids. I often read about the fun parents have baking with their kids, I wonder if it is really true. To me, it was really 越帮越忙.

Hubby thinks it's alright to just add in one more egg since quite a lot spilled out. I don't know, but what can I do? I don't want to start again and waste the 3 eggs. So my cake had about 4.5 eggs, and they're extra large eggs somemore.


I'm not sure if the eggs had an impact or was it the way I folded in the flour that caused my cake to fail. I could see that after I mixed in the chocolate flour, the batter suddenly became quite little. I was expecting a big cake since the egg mix was pretty volumous. Also, I had forgotten to preheat the oven earlier, so the batter was like waiting for about 10 mins for the oven to be ready, and I thought it shrank even more as it sat there. The cake did not rise much in the oven but the aroma was fantastic.

KK kept asking if it's ready so I actually stopped the baking about 5 mins earlier than the required time, when the skewer turns out clean. I'm not sure if I'd let it complete the timer, would it make any difference. Another lesson for bakers - never be forced by hungry children to short-cut the baking time.

As you can see from the picture above, the bottom part of the cake is not rised properly. It was such a flat cake that there is no way I can slice it into 3 parts to put in the fillings... :(


The taste is not bad though. The man and boys in the family loved it. I trimmed the corners of the cake to make it square and they gobbled it up.

I decided to bake another cake for our anniversary and transform this sponge into Lamingtons. Lamingtons is a traditional Australian cake, usually a sponge cake, in the shape of a cube, coated in a layer of traditionally chocolate icing then desiccated coconut. Lamingtons are most likely named after Charles Cochrane-Baillie, 2nd Baron Lamington, who served as Governor of Queensland from 1896 to 1901. I first learnt about this from KK, who said he ate some in school. Personally, I'd never eaten nor seen Lamingtons before, though it shouldn't be hard to find them.

It's easy to make them, using leftover chocolate icing for the 'real' anniversary cake and ready made dessicated coconut. Just cut them into cube, poke with a fork and dip or spread the chocolate icing over it and then dip or sprinkle the coconut over it. It turned out quite nice, like snow flakes on the cake and the combination of coconut and sweet chocolate icing actually makes my hard cake taste better.


I made another version when I ran out of chocolate icing. This time, I coated the cake with strawberry jam and then coconut. Also not bad and not as sweet as the chocolate icing. To differentiate the two, I used red paper cups for the strawberry version.